ROS example by topic
Setup
Tips: Every ROS node needs to be run in separate terminal and for each below command, pls open a new terminal.
Note: Below assume relevant Turtlebot3 packages are installed. I.e. turtlebot3_gazebo turtlebot3 turtlebot3_msgs (this depends)
As always whenever open a new terminal in ROS1 do:
source devel/setup.bash
Same Gazebo Environment is used for below examples which is:
roslaunch turtlebot3_gazebo turtlebot3_stage_2.launch
roslaunch turtlebot3_slam turtlebot3_slam.launch
# have a look at this launch file, it launchs gmapping & rivz
Troubleshoot
If terminal shows: ModuleNotFoundError: No module named 'rospkg' Try:
# https://answers.ros.org/question/245967/importerror-no-module-named-rospkg-python3-solved/
sudo apt-get install python3-catkin-pkg-modules
sudo apt-get install python3-rospkg-modules
DO NOT use this command: sudo apt-get install python3-catkin-pkg
Sides: Below example use turtlebot3 as it has rich community support. Have a look at all launch file with a prefix of turtlebot3_ if time. The code applies to all robot as the topic is how different sensors are communicated.
Marker
Code
import rospy
from visualization_msgs.msg import Marker
from geometry_msgs.msg import Point


def print_points(points_list):
    """
    https://answers.ros.org/question/220943/publishing-marker-points-python/
    """
    pub = rospy.Publisher('visualization_marker', Marker, queue_size=1)
    rospy.loginfo('Publishing example line')

    rate = rospy.Rate(5)

    iterations = 0
    while not rospy.is_shutdown() and iterations <= 10:
        marker = Marker()
        marker.header.frame_id = "/map"

        marker.type = marker.POINTS
        marker.action = marker.ADD
        marker.pose.orientation.w = 1

        marker.points = points_list
        t = rospy.Duration()
        marker.lifetime = t
        marker.scale.x = 0.4
        marker.scale.y = 0.4
        marker.scale.z = 0.4
        marker.color.a = 1.0
        marker.color.r = 1.0

        pub.publish(marker)
        iterations += 1
        rate.sleep()

def print_line(points_list, rgb=(0,0,255), mid=0):

    pub_line_min_dist = rospy.Publisher('visualization_marker', Marker, queue_size=1)
    rospy.loginfo('Publishing example line')
    iteration = 0

    while not rospy.is_shutdown():
        if iteration >= 3:
            break
        marker = Marker()
        marker.id = mid
        marker.header.frame_id = "/map"
        marker.type = marker.LINE_STRIP
        marker.action = marker.ADD

        # marker scale
        marker.scale.x = 0.03
        marker.scale.y = 0.03
        marker.scale.z = 0.03

        # marker color
        marker.color.a = 1.0
        marker.color.r = rgb[0]
        marker.color.g = rgb[1]
        marker.color.b = rgb[2]

        # marker orientaiton
        marker.pose.orientation.x = 0.0
        marker.pose.orientation.y = 0.0
        marker.pose.orientation.z = 0.0
        marker.pose.orientation.w = 1.0

        # marker position
        marker.pose.position.x = 0.0
        marker.pose.position.y = 0.0
        marker.pose.position.z = 0.0
        t = rospy.Duration()
        marker.lifetime = t
        # marker line points
        marker.points = points_list

        # Publish the Marker
        pub_line_min_dist.publish(marker)
        iteration += 1
        rospy.sleep(0.5)

if __name__ == "__main__":
    rospy.init_node('marker_example')
    tmp = []
    # first point
    first_line_point = Point()
    first_line_point.x = 0.0
    first_line_point.y = 0.0
    first_line_point.z = 0.0
    tmp.append(first_line_point)
    # second point
    second_line_point = Point()
    second_line_point.x = 1.0
    second_line_point.y = 1.0
    second_line_point.z = 0.0
    # second point
    thrid = Point()
    thrid.x = 2.0
    thrid.y = 2.0
    thrid.z = 0.0
    tmp.append(thrid)

    print_points(tmp)
    # print_line(tmp)
python3 marker.py
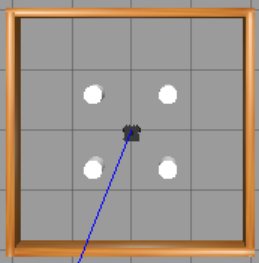
To see the marker published on Rviz, Add marker topic to Rviz by click the add button (see below).
Note: U can save this rviz config file: File -> save config as, and then later run it by include it in the rviz command
 To change marker type to e.g. line instead of point, see Different marker datatype official docs which is one example of many ROS datatype.
Movebase
Code
"""
Acknowledgement: https://hotblackrobotics.github.io/en/blog/2018/01/29/action-client-py/#2-the-movebase-node
"""
import rospy
#Brings in the SimpleActionClient
import actionlib
#Brings in the .action file and messages used by the move base action
from move_base_msgs.msg import MoveBaseAction, MoveBaseGoal

def movebase_client():

   # Create an action client called "move_base" with action definition file "MoveBaseAction"
    client = actionlib.SimpleActionClient('move_base',MoveBaseAction)

   # Waits until the action server has started up and started listening for goals.
    client.wait_for_server()

   # Creates a new goal with the MoveBaseGoal constructor
    goal = MoveBaseGoal()
    goal.target_pose.header.frame_id = "map"
    goal.target_pose.header.stamp = rospy.Time.now()
   # Move 0.5 meters forward along the x axis of the "map" coordinate frame
    goal.target_pose.pose.position.x = 0.5
   # No rotation of the mobile base frame w.r.t. map frame
    goal.target_pose.pose.orientation.w = 1.0

   # Sends the goal to the action server.
    client.send_goal(goal)
   # Waits for the server to finish performing the action.
    wait = client.wait_for_result()
   # If the result doesn't arrive, assume the Server is not available
    if not wait:
        rospy.logerr("Action server not available!")
        rospy.signal_shutdown("Action server not available!")
    else:
    # Result of executing the action
        return client.get_result()

# If the python node is executed as main process (sourced directly)
if __name__ == '__main__':
    try:
       # Initializes a rospy node to let the SimpleActionClient publish and subscribe
        rospy.init_node('movebase_client_example')
        result = movebase_client()
        if result:
            rospy.loginfo("Goal execution done!")
    except rospy.ROSInterruptException:
        rospy.loginfo("Navigation test finished.")
You should see the robot move forward a bit from the map.
python3 movebase.py
roslaunch turtlebot3_navigation move_base.launch
# run the action server
Tips: If confuse on a term e.g. action server, see official ROS docs for more information
Laser scan
python3 laserScan.py
Code
"""
Acknowledgement: This code example is by my lab tutor: Joshua Goncalves, from COMP3431
Link (dont recall if useful): https://www.youtube.com/watch?v=q3Dn5U3cSWk&feature=emb_logo&ab_channel=TheConstruct
"""
import rospy
from sensor_msgs.msg import LaserScan
from geometry_msgs.msg import Twist
from std_msgs.msg import Bool

def callback(msg):

    # Min/Max Range of the LIDAR in metres
    # 120mm ~ 3500mm approximately
    print("range_min: ", msg.range_min)
    print("range_max: ", msg.range_max)

    # Min/Max Angle of the LIDAR in radians
    # 0 radians to 6.28 (0 degrees to 360 degree)
    # Accuracy of 1 degree or 0.017 radians
    print('angle_min: ', msg.angle_min)
    print('angle_max: ', msg.angle_max)

    # The ranges have 360 values, one for each degree
    # The ranges are the distance in metres of the detected objects at each degree
    #       If an object is closer than 0.1199 metres or further away than 3.5 metres, it will appear as 0.0
    #       Distance accuracy also degrades the further away it is, but you probably dont need to worry too much about this
    print('len(ranges): ', len(msg.ranges))

    # The intensities have 360 values, one for each degree
    # The intensities are basically the reflectivity of the surface that is hit
    #       Surfaces that are highly reflective will reflect the majority of the beam and have a high intensity (like a mirror)
    #       Surfaces that do not have high reflectivity will have low intensity (like some black, matte material)
    # This might be useful in detecting walls based on their reflectivity, but I'm not too sure how sensitive the intensity is
    #       or how obvious a wall will be. Otherwise it can probably be used to just confirm that you've actually found an
    #       object based on its intensity.
    print('intensities: ', len(msg.intensities))

    target_distance = 0.1 # 0.1m or 100mm
    target_intensity = 4800.0 # You'll need to confirm this against the wall to ensure it's correct
    laser_ranges = msg.ranges

    # From the wheel end going in an anti-clockwise direction
    print('distance at angle 0: ',laser_ranges[0])
    print('distance at angle 45: ',laser_ranges[44])
    print('distance at angle 90: ',laser_ranges[90])
    # print('distance at angle 180: ', laser_ranges[180])
    # print('distance at angle 270: ',laser_ranges[270])
    for i in range(3):
        print()
rospy.init_node('laser_scan_example')
sub = rospy.Subscriber('/scan', LaserScan, callback)
pub = rospy.Publisher('/cmd_vel', Twist, queue_size=2)
rospy.spin()
As seen from below output, at angle 45, the distance is shorter than other due to the existance of the obstacle.
range_min:  0.11999999731779099
range_max:  3.5
angle_min:  0.0
angle_max:  6.28318977355957
len(ranges):  360
intensities:  360
distance at angle 0:  1.9048655033111572
distance at angle 45:  0.7371895909309387
distance at angle 90:  1.8515843152999878
Twist, cmd_vel
Google will do.
Camera
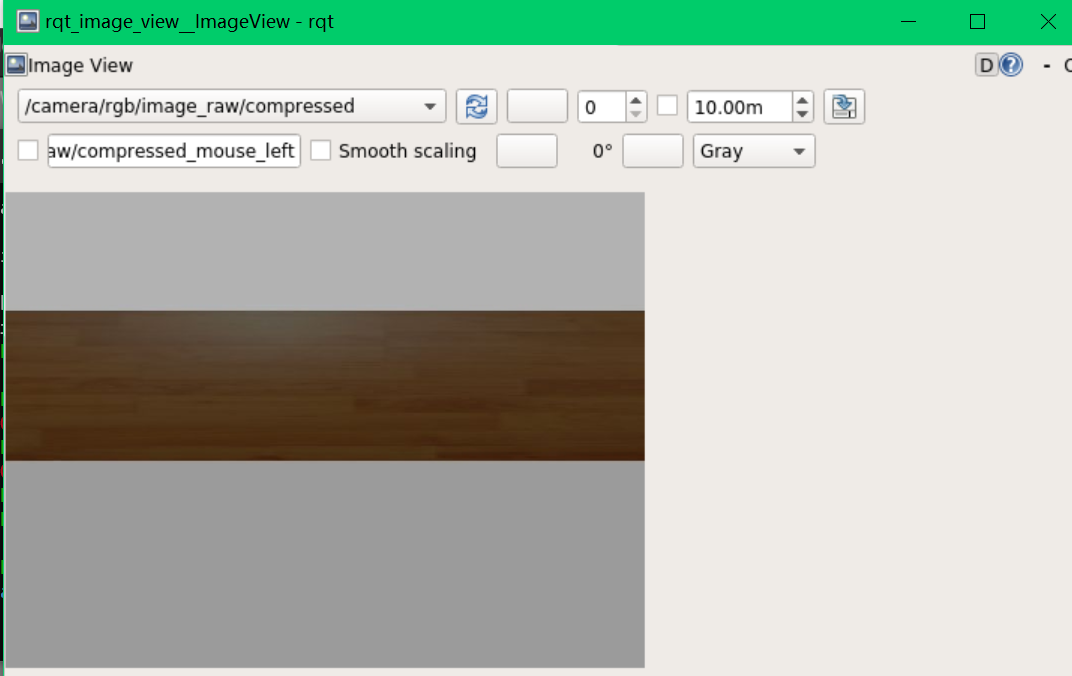
rqt_image_view
Change the topic as below and it feeds the frame received by the camera topic.
Code example?
Tips:Try google search/youtube, in particular, websites like: theConstructsim
Important: Try subscribe to the /compressed camera topic which is a lot faster if intensive image processing is performed. U canno visualise the result e.g. u want to draw a bounding box on the detected object, use cv2.imshow() because it does not uses the ROS framework - it only gives one frame of detection, instead, you need to the bounding box to the rivz to visualise it (which gives continuous frames).
Click Point
Code
import rospy
from nav_msgs.msg import Odometry
from geometry_msgs.msg import PointStamped
from std_msgs.msg import Bool
from std_msgs.msg import Int8

def receive_point(p):
    print("click a point on Rviz to begin")
    current_position = rospy.wait_for_message("/odom", Odometry)
    current_position = (current_position.pose.pose.position.x, current_position.pose.pose.position.y)

    click_points_received = (p.point.x, p.point.y)

    print("currntion location:", current_position)
    print("click point received: ",click_points_received)

def shut_down():
    rospy.loginfo("down")

if __name__=="__main__":
    rospy.init_node('click_point_example')
    rospy.Subscriber('/clicked_point', PointStamped, receive_point)
    rospy.on_shutdown(shut_down)
    rospy.spin()
Publish a point by clicking the “Publish point” as below.

python3 clickPoint.py
Expected Output
currntion location: (2.4888179034530077e-05, 8.294009546984934e-05)
click point received:  (1.3474631309509277, 0.15017054975032806)
Which is reasonable since the starting position is nearly (0,0)
Leave a comment